DIY clay gift tags


With a week until Christmas day, it seems I really need to start putting up some festive content! I had planned to create plenty of Christmassy posts this year but, as usual, life got in the way. I’ve got two festive posts this week, starting with these very merry festive tags.
As with most of my DIYs, you’ll need some clay (air drying or oven baked, like fimo). I love gift giving and to me, the wrapping is part of the fun. I know the wrapping paper will be torn off quickly, but the gift tags can be used again and again, as well as giving the receiver that knowledge that you put in the extra effort! Personalising gifts just adds that extra special touch and these can even be hung on the tree as ornaments (bonus present!) Obviously, these gift tags work for any occasion and you can decorate them however you fancy! This DIY doesn’t need a step by step as the photos are self-explanatory, but I’ll give you a brief rundown of how they’re made.
You will need:
Clay
Shape cutters
Drinking straw
Sandpaper
Paint
Twine/String
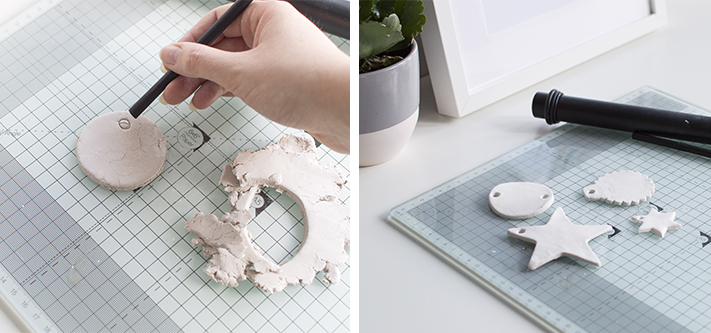
Start off by rolling out your clay until it’s the thickness of a pound coin. Use cutters to cut out your shapes – round or star cutters look fab. If you’re making tags that look like baubles, lightly indent the round circle in to your clay. Using a craft knife, add an extra piece at the top of the circle for the hanging element of the ornament before you then cut around the circle you had indented in the clay with your knife.
To make the holes to attach the string, use a drinking straw and place one end of the straw into the clay to create a perfect circular hole. Once baked or dried, you can use sandpaper to smooth the edges and give a professional finish.
The next stage is the fun part. I painted mine using white paint and then added on extra details. I’ve shown one technique in the photos of using washi tape to mask off one section of the circle to add some colour. This way you’ll get a perfect straight edge, but you can also dip the tag into paint to get a cool effect, add patterns or cover the whole thing in paint! I also used glitter pens to add a sparkly touch to the bauble designs, and for the writing, I just used fine tip felt pens. The options are endless for these! If you’d like a shiny finish, you can glaze these with a medium like Mod Podge or simple PVA glue. Your gift tags can then be threaded with twine, string or ribbon and added to the present.
That really is all there is to it! Let me know if you make these – I’d love to see! You can tag me on Twitter @moodycat or Instagram katie_moody